
By Dustin Guttadauro, Product Line Manager - Telecom & Fiber, Infinite Electronics
What is a patch panel, in plain terms? It's a rack-mounted strip of ports where your building's permanent network cables end. Instead of running each cable straight into a switch, you terminate it on the back of the panel, then connect the front of the panel to the switch with a short patch cord. That one extra step is what turns a pile of cables into something you can label, trace, and change in a few minutes.
If you're setting up your first structured rack, this guide walks through what a patch panel does, how feed-through and punch-down panels differ, when you need copper or fiber, and how to lay out a tidy patch field. You'll also find a labeled diagram and a beginner setup checklist. For racks, cabling, and connectivity beyond the patch panel itself, see the full range of L-com data center solutions.
Key Takeaways
- A patch panel is passive hardware. It needs no power and does no switching; it gives every permanent cable run a fixed, numbered place to land.
- Punch-down panels terminate solid cable on IDC contacts at the back, while feed-through panels use RJ45 couplers, so you plug in on both sides without a punch tool.
- Copper panels have RJ45 ports matched to a cable category such as Cat6 or Cat6a. Fiber panels hold adapter plates or cassettes, usually LC or MPO.
- Under TIA-568, a copper channel can be up to 100 meters: at most 90 m of permanent cable plus 10 m of patch cords split across both ends.
- Match the panel's category and shielding to your cable. A Cat5e panel on a Cat6a run limits the whole channel to Cat5e performance.
What Is a Patch Panel Used For?
A patch panel separates the cabling you install once from the connections you change often. The long runs out to desks, ceiling access points, cameras, or other racks get terminated on the back and are then left alone. Everything you move, add, or swap happens on the front with short patch cords.
Without a panel, those long runs plug directly into switch ports. That works on day one. Six months later, when a switch fails, you're pulling on cables that were never meant to be handled, often without knowing which one goes where. Horizontal cable is solid-core and can crack with repeated flexing; stranded patch cords are built for it.
A panel also gives you a clean test point: you can certify each permanent link from the panel port to the wall outlet.
Anatomy of a Patch Panel
Most first racks use 24-port, 1U copper panels that mount in a standard 19-inch rack. The diagram shows the front, the back, and where the panel sits in the signal path. The numbers match the list below it.
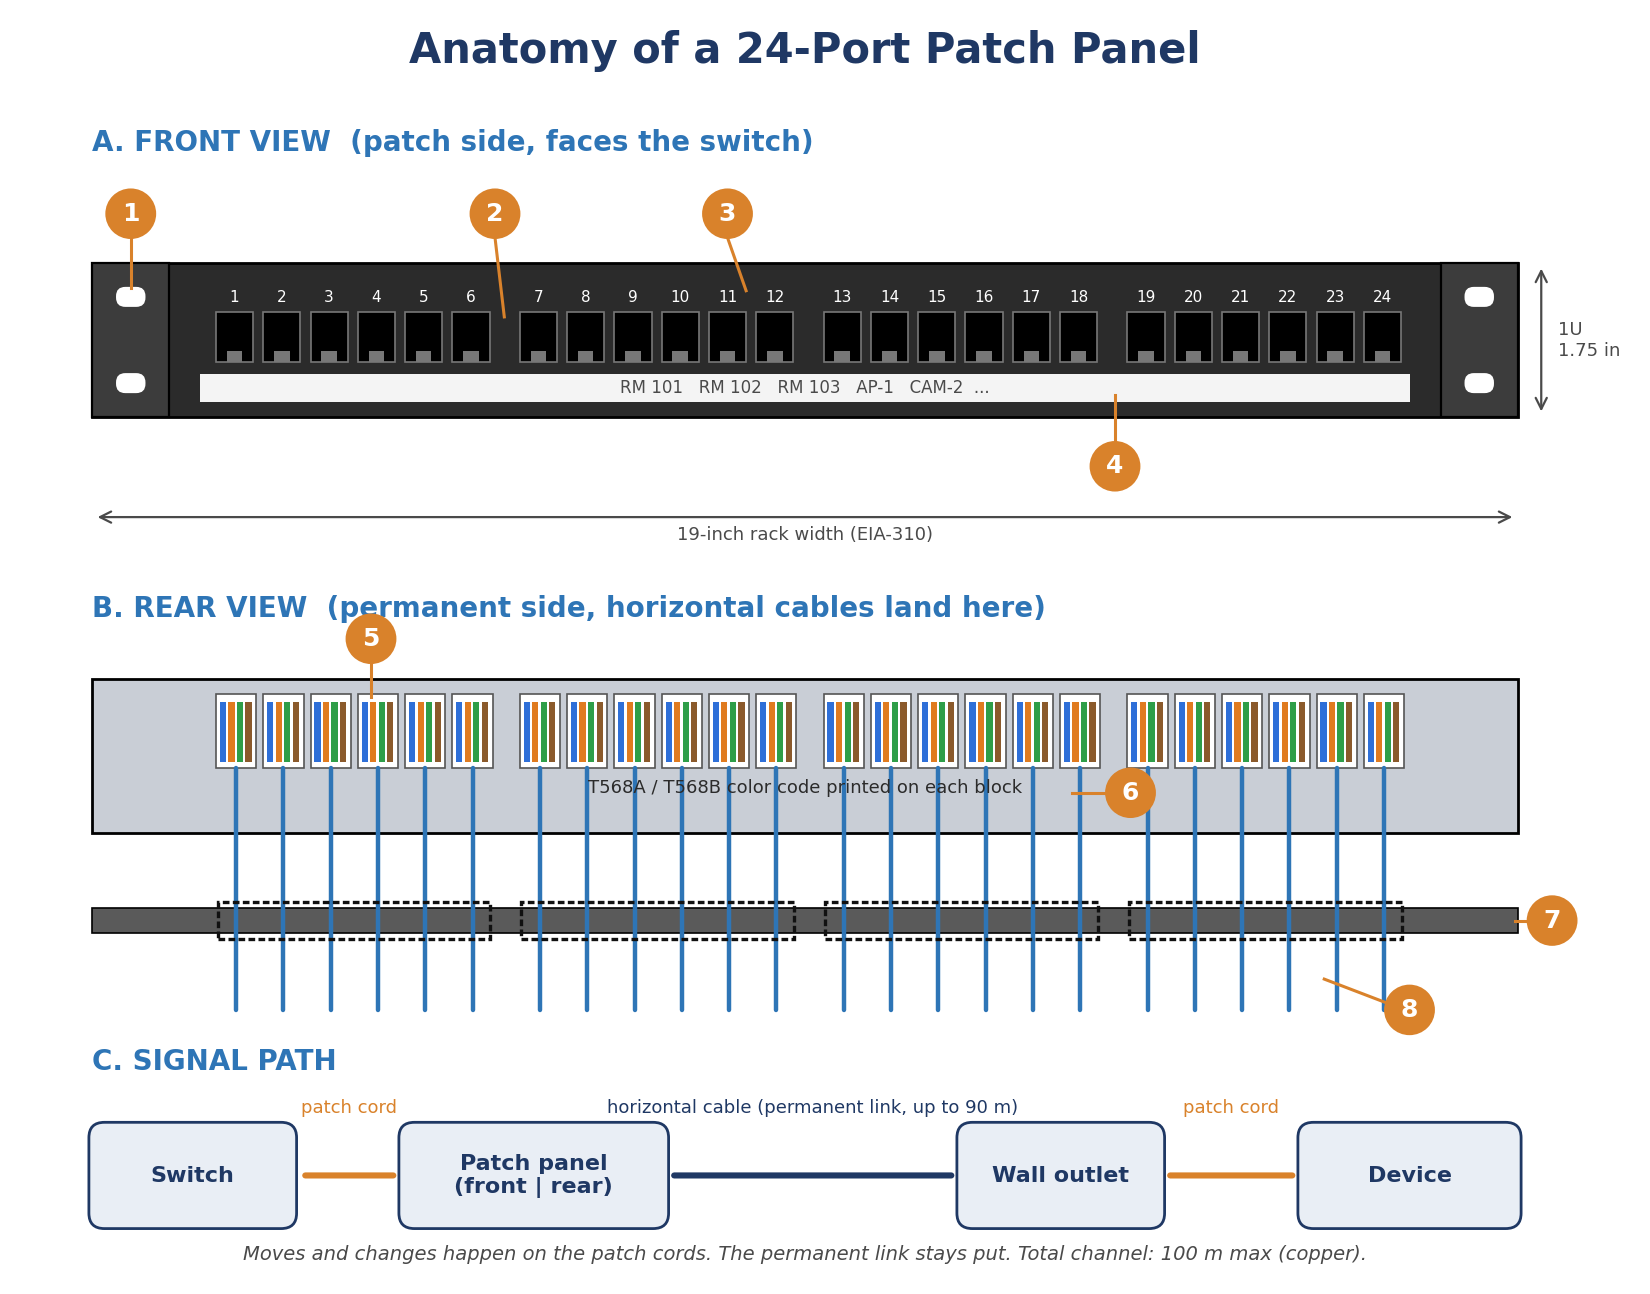
Figure 1. Front view, rear view, and signal path of a typical 24-port punch-down patch panel.
- Rack ears and mounting holes. These screw the panel to the rack rails. One rack unit (1U) is 1.75 inches tall.
- Front RJ45 ports. The patch side, where short cords run to the switch.
- Port numbers. Printed above each port, so every cable run has a permanent ID.
- Label strip. A write-on or printable strip for room numbers, outlet IDs, or device names.
- Punch-down terminations. Each cable's eight conductors are pressed into insulation displacement contacts (IDC) on the back.
- Color code. T568A and T568B wiring colors, so you know which conductor goes in which slot.
- Rear cable management bar. Cables get strapped to this bar so their weight doesn't pull on the terminations.
- Horizontal cable. The permanent run to a wall outlet or device, up to 90 meters for copper.
Feed-Through vs Punch-Down Patch Panels
The main choice with a copper panel is how cables connect at the back. From the front, both types look almost identical.
Punch-Down Panels
Punch-down panels have IDC blocks on the rear, usually 110-style. You strip the jacket, lay each conductor into its color-coded slot, and seat it with a punch-down tool that trims the excess in the same stroke. This is the standard approach for structured cabling because the termination is permanent, compact, and cheap per port. The catch is technique: your first few will be slow, and sloppy ones fail certification.
Feed-Through Panels
Feed-through (or pass-through) panels put an RJ45 coupler in each port. You plug a terminated cable into the back and a patch cord into the front. Swapping a run is as simple as unplugging it. They suit small rooms, labs, and installs that use pre-terminated cable. They do need more depth behind the panel, and every cable at the back has to have a plug on it.
What About Keystone Panels?
A keystone panel is a blank frame with openings for snap-in jacks. You terminate each jack on its own, then click it into place. That lets you mix Cat6, Cat6a, fiber, or coax in one panel, and replace a single damaged port without pulling the whole panel. L-com's data connectors and keystone jacks cover the common Cat6, Cat6a, and Cat8 options.
|
Feature |
Punch-Down |
Feed-Through |
Keystone |
|
Rear connection |
IDC punch-down blocks |
RJ45 couplers |
Snap-in jacks |
|
Tools needed |
Punch-down tool, stripper |
None beyond cable prep |
Depends on jack type |
|
Install speed |
Slower until practiced |
Fastest |
Moderate |
|
Cost per port |
Lowest |
Moderate |
Varies; jacks sold separately |
|
Fixing one bad port |
Re-terminate on the panel |
Swap the cable or panel |
Replace one jack |
|
Best fit |
Permanent structured cabling |
Small rooms, labs, pre-terminated runs |
Mixed media, changing layouts |
Tip: Practice on a scrap length of cable before you touch the real runs. Keep each pair twisted to within about 0.5 inch (13 mm) of the contact; untwisting more than that is one of the most common reasons a Cat6 link fails testing.
Copper vs Fiber Patch Panel Options
Copper panels handle twisted-pair Ethernet through RJ45 ports. Fiber panels look different: a 1U or 2U enclosure holds adapter plates or cassettes, and the front ports are fiber adapters that join a patch cord to the trunk or pigtail behind it. LC duplex is the usual choice for individual links, and MPO/MTP for high-count trunks.
|
Feature |
Copper Patch Panel |
Fiber Patch Panel |
|
Front ports |
RJ45 |
LC, SC, or MPO/MTP adapters |
|
Rear termination |
Punch-down, coupler, or keystone |
Spliced pigtails, field connectors, or pre-terminated cassettes |
|
Distance |
100 m channel |
Much longer; depends on fiber type and speed |
|
Typical use |
Desks, APs, cameras, in-rack links |
Backbone links between racks, rooms, and floors |
|
Handling |
Match category and shielding |
Keep ends capped and clean; respect bend radius |
Most small facilities start with copper and add a fiber panel once they link a second rack or floor. For bigger rooms and high-density designs, our guide to patch panels for the data center goes deeper on both.
Recommendation: Shielded panels only help if the cable is shielded end to end and the panel is bonded to the rack's ground. If you're running unshielded (U/UTP) cable, buy unshielded panels.
How Does a Patch Panel Create a Clean Patch Field?
A patch panel gives every connection a fixed position, so patch cords can stay short and organized. The patch field is the part of the rack where panels and switches face each other, and when it's laid out well, anyone on your team can trace a connection in seconds.
The layout most small racks use alternates panels and switches: a 24-port panel, a 24-port switch directly below it, then the next pair. Port 1 on the panel sits right above port 1 on the switch, so the cords between them can be a foot long or less. Add a horizontal cable manager between pairs if the cords need room to route.
This setup is called an interconnect. Larger rooms sometimes use a cross-connect, where switches are cabled permanently to a second set of panels and all patching happens panel to panel, but it takes more space and most first racks don't need it.
A few habits keep it tidy over time:
- Use one patch cord color per purpose, such as blue for user data and yellow for uplinks, and write the scheme down.
- Buy cords in the lengths you need. Coiling a 7-foot cord into a 1-foot gap is how racks get messy.
- Label both ends of every permanent run with the same ID as its panel port.
- Leave a few ports open on each panel for growth.
Beginner Patch Panel Setup Checklist
None of these steps needs special training. Go slowly on the first few terminations and test as you go.
- Count your cable runs, add 20 to 30 percent for growth, and choose 24-port or 48-port panels to match.
- Match each panel to your cable: same category (Cat6 or Cat6a) and same shielding.
- Pick T568A or T568B and use it on every panel and wall jack in the building. Consistency matters more than which one you pick.
- Plan the rack layout before mounting anything: panel, switch, cable manager, repeat, with open space left for growth.
- Route horizontal cables into the rack with a small service loop, and strap them to the rear management bar. Hook-and-loop straps are easier on cable than tight zip ties.
- Terminate runs in port order, keeping pair twists close to the contacts.
- Label each panel port and its far-end outlet with matching IDs.
- Test every permanent link with a certifier, or at minimum a wiremap tester, before connecting equipment.
- Patch to the switch with short, color-coded cords and record which panel port feeds which switch port.
Tip: Keep a simple spreadsheet with panel port, outlet ID, location, and switch port. It saves hours the first time something goes down.
Building Your First Patch Field with L-com
Once you know your port count and cable category, the hardware list is short. L-com stocks patch panels and rack panels in Cat6 and Cat6a, which covers most first builds. The short answer to "what is a patch panel" is a fixed place for cables to land, and getting that first one right makes every later change easier. When you're ready to plan racks, cabling, and fiber for the rest of the room, browse L-com's data center product line.
Frequently Asked Questions (FAQs)
Do I Need a Patch Panel for a Small Network?
If your cables run through walls or ceilings, yes. A desk with three cables going to a switch can skip it, but permanent runs are safer and easier to manage on a panel. Adding one during the install is far cheaper than retrofitting later.
Is a Patch Panel the Same as a Switch?
No. A switch is a powered device that moves data between connected equipment. A patch panel is passive and only connects cables, so you still need a switch for the network to work.
Does a Patch Panel Slow Down Your Network?
A properly rated, well-terminated patch panel has no practical effect on speed. Trouble comes from mismatched categories or poor terminations, which can cause errors or force a link to run at a lower speed. Testing each link after install catches these problems early.
Can I Use a Cat6 Patch Panel with Cat6a Cable?
It will connect, but a channel only performs as well as its lowest-rated part, so you'd get Cat6 performance. That matters for 10 Gb/s: Cat6 supports 10GBASE-T only up to about 55 meters, while Cat6a supports it to the full 100 m.
What's the Difference Between a 24-Port and 48-Port Patch Panel?
Port count and height. A 24-port panel is usually 1U, and a 48-port panel is usually 2U, though high-density 1U versions exist. Pairing panel size with switch port count keeps the patch field lined up.